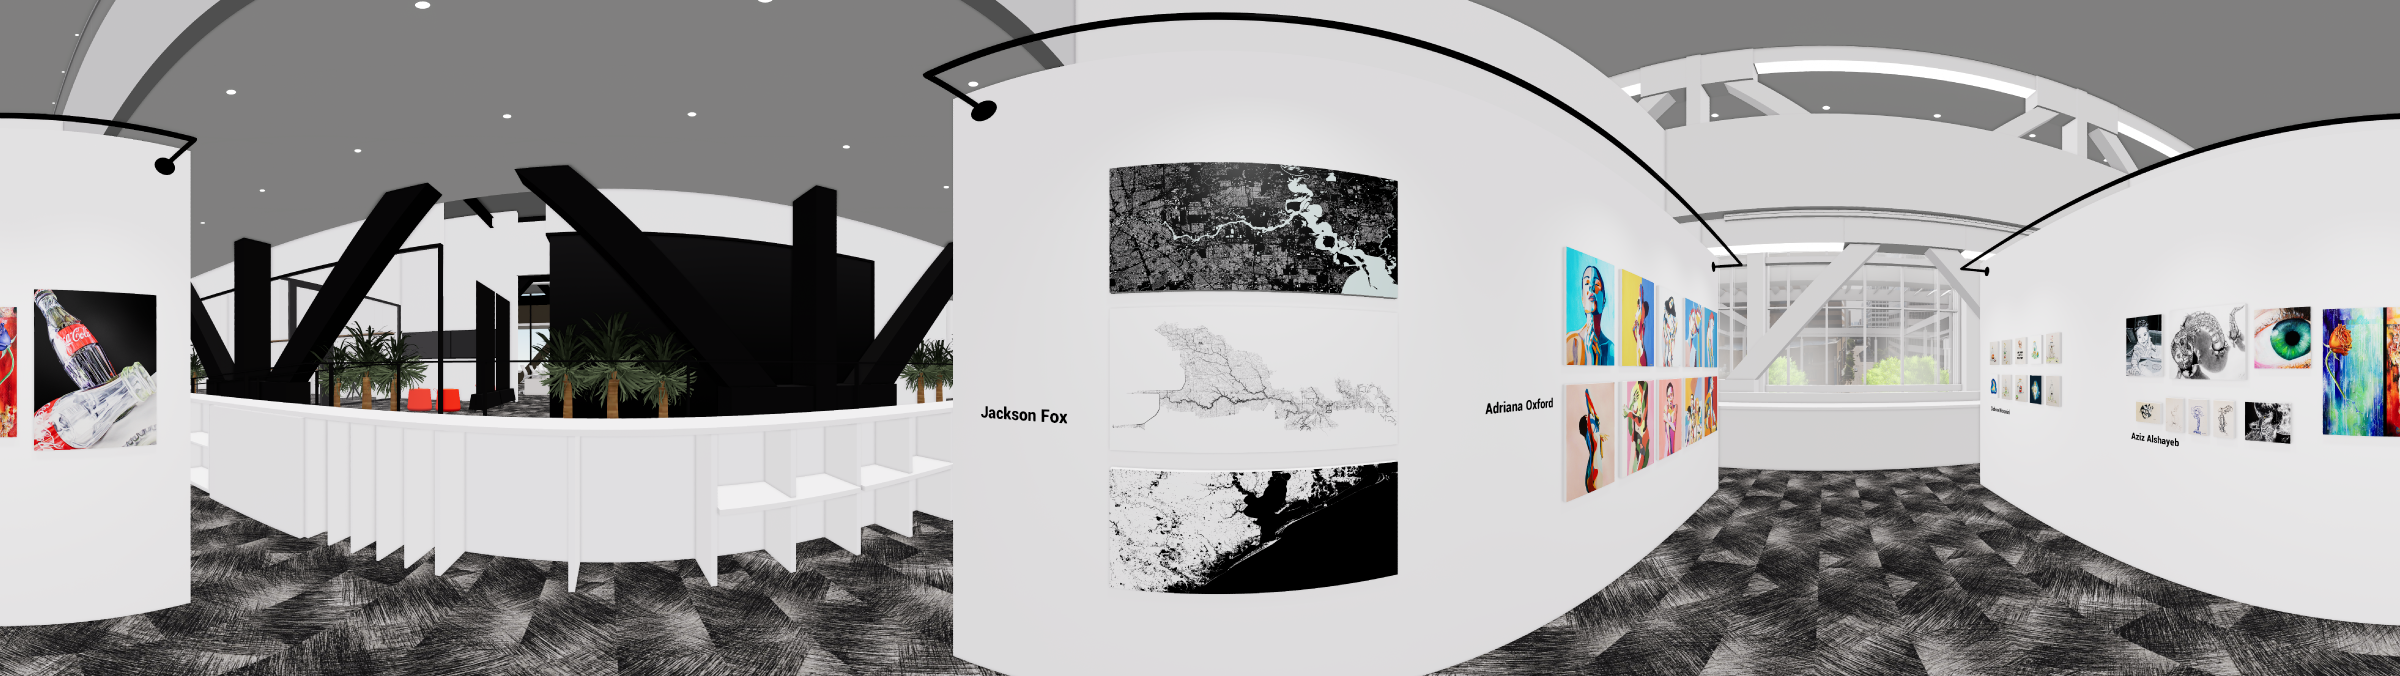
Diversions 2020: A Virtual Art Gallery

In the Gensler Houston office, we have been hosting an annual art event since 2014 that showcases the creative “diversions” of our fellow coworkers. Employees are encouraged to submit their personal work and passion projects – nothing Gensler or client related – and our office-turned-art-gallery typically displays everything from traditional art mediums to furniture, handcrafted jewelry, baked goods and infused alcohols.  Diversions has grown to become one of our best cultural and inspirational office events each year because it allows us to learn more about our coworkers and see their creative talents and passions firsthand.

Only a few months after we moved into our new office, the news of the pandemic hit and we all went home. Most of us haven’t been back since. Fast forward to September, we are still at home and we realize that our beloved Diversions celebration may not happen this year – a year when we need inspiration and culture the most.

We decided we weren’t going to let COVID-19’s cancel culture take this one, so we set off to make it virtual. Despite working from home, this year’s gallery was designed to virtually showcase the art in our own Houston Office with over 100 pieces in 20 different mediums.

To enter our virtual office gallery, click on the photo below. To learn more about how we made it, keep reading.

Click Image to Enter Virtual Diversions 2020

The Making of Virtual Diversions

Challenge: Create a virtual art gallery inside the Houston Office where people can interact with the art, read information about it and possibly link to websites where the user can find out more about the artist or maker.

There are many ways to make a virtual art experience. We knew we wanted the user to see the artwork displayed throughout the office and we had a pretty good 3D model started, so that step was mostly out of the way. Then we needed to figure out how we could allow the user to interact with the art so that they could get a good close-up view of each piece and read a few facts or quick description about the art.

This took a bit more thinking and experimentation. We tried a few different mechanisms for dealing with this and eventually ended up using the service Yulio to create a 360 interactive virtual tour of the office. We ‘hung’ the artwork in our 3D model, exported 360 panoramic images, uploaded those images to the Yulio website and added all the custom notes and photos to create the full experience. We ended up doing it this way primarily because it was the easiest way to share a virtual experience with a simple weblink; however, on the way there we developed a more experimental version.

Walking and interacting with art in Unreal Engine

Using unreal engine, a game/experience development software, we added interactivity to our 3D model elements and created an experience that allows the user to freely walk around the office and interact with the artwork in a similar but more custom and personal way. This interactivity was created using the Blueprints system in Unreal Engine which is a type of visual programming similar to Grasshopper for Rhino. Utilizing this workflow allows us to reuse these blueprint scripts in future projects. This R&D brings us closer to being able to deliver this type of custom experience to our clients which will allow them to engage in a more unique way with their projects.

Quick look at player character blueprints system in Unreal Engine

This type of experience could manifest in many different ways including a training experience where clients can take new employees through the building, show them around or train them how to use specific equipment. We could also create an experience that takes a potential tenant through a new development, highlighting the amenities and possible floor plan layouts. From a design perspective, we can create custom experiences for proposals that tell an interactive story where each stakeholder can freely walk around and discover the design in a truly exploratory way. 

While you’re in the exhibit don’t forget to check out my mandala art on display!

Angela Palmer Mandala Gallery 360 Panoramic

The Diversions Team

Design Technologist: Angela Palmer & Bryan Brady 

PR: Nina Miller, Shaina Pherigo, Katelyn Howard

Create a block wall in grasshopper with random depths

Project Overview

A popular design for walls and ceilings these days is to create a random assortment of blocks or other shapes that create depth to a previously flat surface. We will learn how to create a system like this in grasshopper.

Create and divide the boundary surface into panels

First, we need to define the extents of the wall or ceiling element by creating a surface. From here we will divide the surface into panels.

To do this with native grasshopper components we use the isotrim (SubSrf) component to create a grid of panels from our surface. Isotrim takes a base surface and a domain to calculate the new surface. Rather than constructing a new domain, which will just build another surface at the u and v dimensions within our existing surface, we want to use the divide domain^2 so that we divide the two-dimensional existing surface into equal components. After plugging in the domain to the isotrim component we can see the grid but do not have access to the individual cells so we cannot manipulate them yet. For this, we need to use the Deconstruct Brep (DeBrep) component which will output the faces, edges, and vertices of our new divided surface parts. Before moving on to the extrusion of these faces, we want to make sure we flatten the faces output so we can manipulate the faces individually. Right click on the F output variable and select Flatten. We will dive deeper into this in the extrusion section.

Using the Lunchbox components for easy paneling different panel shapes

Another and much simpler way to create panels from a surface is to use the lunchbox component which can be downloaded from the links below. Not only is it much simpler, but you can also create many different panel shapes such as diamonds, hexagons, and variable rectangles.

LunchBox For Grasshopper – Proving GroundLunchbox for Grasshopper – food4Rhino

Randomly extrude the blocks from a list of specific depths

To create our blocks we will simply extrude the faces by a certain dimension in the direction perpendicular to the plane we are working in. The XZ plane was defined earlier when we created our initial surface so we will want to extrude in the Y direction with a Unit Y vector.

For the factor (value) input into the vector, Grasshopper has a random component which will give us a list of unique random numbers within a domain but this list will include a lot of different decimal numbers which are not easy to build. For example, if we set a domain between 1 to 6 we will get a list of numbers including 2.006, 4.739, 5.713, etc… These numbers are not easy to build to so we will want to round the output in order to get clean integer numbers.

Create a labeled diagram to show which blocks are at what depth

Now that we have our finished block wall we want to provide information to the builder on which blocks are at which depths so it can be constructed. To do this we use the Text Tag component which takes a location and text to display. For the text, we will plug in our list of depths created at the end of the last section. We will place the text at the center of each box so we will use a Polygon Center component to gather the center points of each box. Once we have a pattern that we are satisfied with we can bake the text tag component to see our numbers populate over the geometry and now we have a diagram that can aid in the construction process.

Pieces of this script can be applied to many different projects so I’d recommend saving this in a folder to access later. Also, if you’d like to try to take this project one step further and use a curve attractor to manipulate the depths of the boxes in a more strategic way, check out my tutorial on curve attractors and see if you can apply that information here!

Thanks for reading.

Tips on Getting Started with Grasshopper for Rhino

Tips grasshoper rhino

Grasshopper can be a very intimidating software to learn. The tool requires you to look at architecture as geometry and physics rather than as strictly form. This can be challenging because it requires a different mindset; however, if you can get past this hurdle, the tool can be extremely powerful. With Grasshopper, we can iterate infinite possibilities of our designs and strategies in a non-destructive way.

When I was first getting started with grasshopper I recognized all of this possibility but had no idea where to start and was turned off by the complexity every time I opened up the program and tried to learn. Eventually, I gave myself a project to do and committed to somehow bringing grasshopper into the process. Over time, I became more comfortable with the program but I definitely learned some lessons along the way.

There are a ton of resources online, use them.

The only way you’re going to learn is by doing so I recommend either finding a project to do like a design competition or craft object; or, by finding some tutorials online to run through for practice. In addition to the official tutorials, Youtube is a great resource for videos but there are also lots of great learning websites with more robust plans. Below are a few that I have tried and liked.

When starting do not try to create everything in grasshopper

Use rhino with grasshopper to simplify the process when just beginning to learn. Some actions are more difficult and less efficient to do in grasshopper.

  • example : creating a unique curve shape to use in a pattern. Sometimes with complex curves, it is easier to create them in rhino and then manipulate them in grasshopper. This can also be said for curves that will create a lofted surface. The benefit of this is that you can freely edit the shape of the curves in Rhino without having to come up with a mathematical solution for reshaping the curves.

Say what you’re trying to do out loud if you get lost

With Grasshopper, you need to really understand what you’re components are doing because you are working on a more granular scale than with other modeling software. For this reason, it is easy to get lost along the way and by saying out loud exactly what you are trying to accomplish step by step it will be easier to locate the correct component. If you’re not much for talking to yourself then making a list or mind map will suffice.

  • example: you want to array a curve (shaped line) along a surface at various points. When modeling you can simply draw the curves (lines) on the surface wherever you’d like and be done with it. This is easy but limiting. Say you don’t know how many instances of the curve you want on the surface, or you’re not sure what the curve shape is yet. This is where grasshopper comes in; however, to do so you have to understand all the steps to
    1. draw the curve
    2. create a grid on the surface
    3. move the curve to the surface grid points using a translation vector
    4. orient the curve to lie flat on the surface using planes or other methods

Catalog your scripts into an organized library so they can be reused when needed

Often we are using the same definitions to do many different projects. When first learning grasshopper you will most likely be doing small tutorials that teach you how to accomplish a specific goal. When doing so it is good practice to save the definition into a folder with an associated image so that you can come back to it later and recognize what the definition is doing for when you want to reuse it in another project. In doing this you will soon have a library of basic definitions that you can reuse over and over again to make future projects much quicker.

Surround yourself with inspiration and motivation to make you think about practicing as often as possible

A few ways to do this are:

  • Find online resources that you like and bookmark the page so you see it in your bookmarks bar regularly
  • add the site as an additional homepage to open everytime you open up the internet. Next time you aimlessly open the browser the blog will be present and you’ll be more inclined to check up on what the latest is if you’re looking for somewhere to start.
  • subscribe to the channel on youtube
  • my favorite, change the background on your desktop to something related to the goal so everytime you sit down at the computer you think about working on something or getting to a certain point.