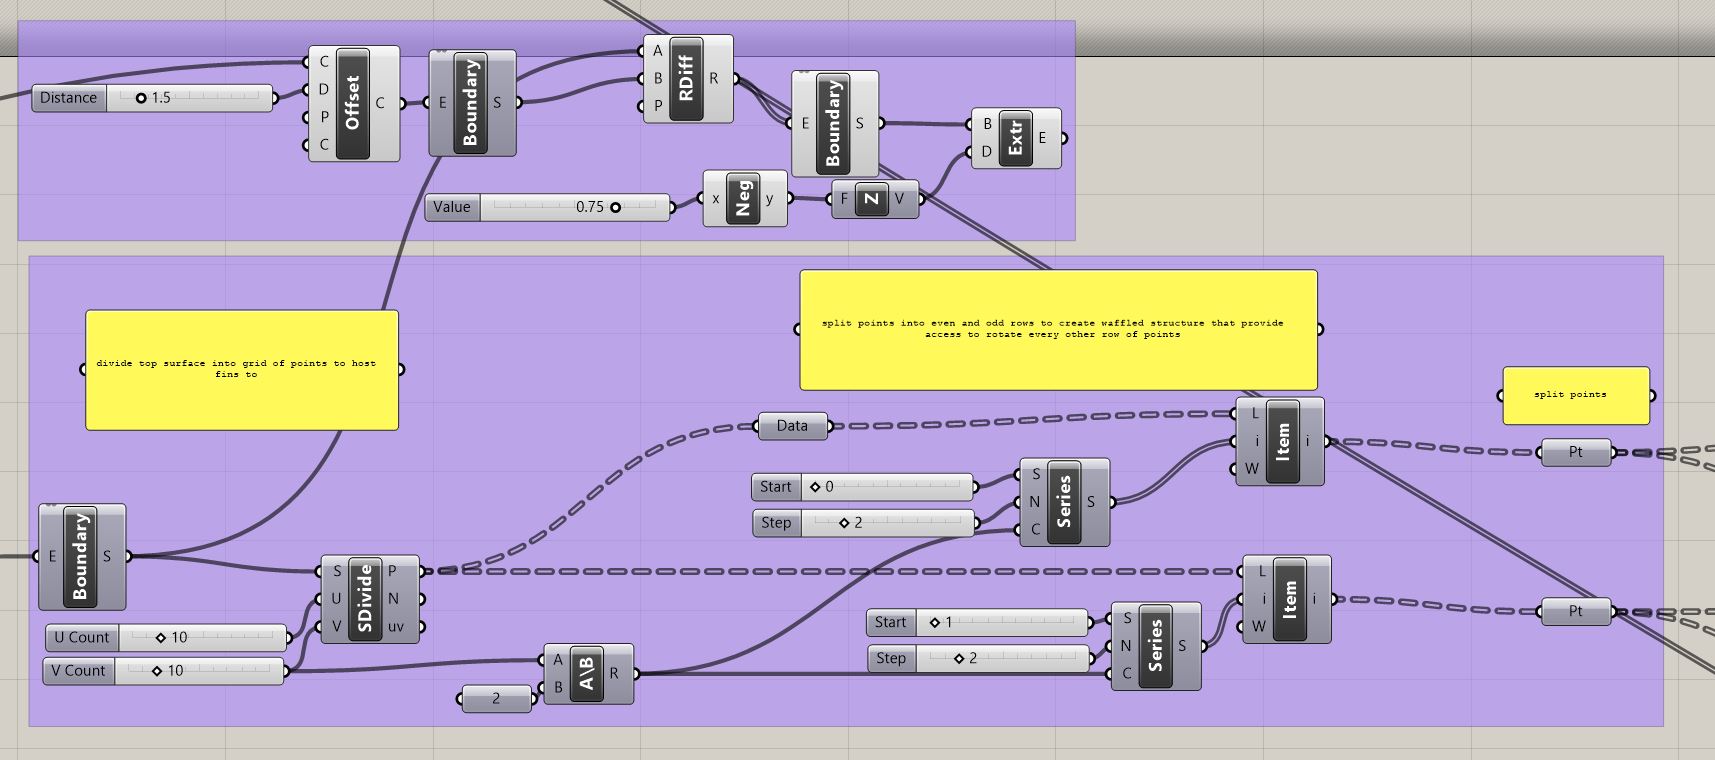
Create a block wall in grasshopper with random depths

Project Overview

A popular design for walls and ceilings these days is to create a random assortment of blocks or other shapes that create depth to a previously flat surface. We will learn how to create a system like this in grasshopper.

Create and divide the boundary surface into panels

First, we need to define the extents of the wall or ceiling element by creating a surface. From here we will divide the surface into panels.

To do this with native grasshopper components we use the isotrim (SubSrf) component to create a grid of panels from our surface. Isotrim takes a base surface and a domain to calculate the new surface. Rather than constructing a new domain, which will just build another surface at the u and v dimensions within our existing surface, we want to use the divide domain^2 so that we divide the two-dimensional existing surface into equal components. After plugging in the domain to the isotrim component we can see the grid but do not have access to the individual cells so we cannot manipulate them yet. For this, we need to use the Deconstruct Brep (DeBrep) component which will output the faces, edges, and vertices of our new divided surface parts. Before moving on to the extrusion of these faces, we want to make sure we flatten the faces output so we can manipulate the faces individually. Right click on the F output variable and select Flatten. We will dive deeper into this in the extrusion section.

Using the Lunchbox components for easy paneling different panel shapes

Another and much simpler way to create panels from a surface is to use the lunchbox component which can be downloaded from the links below. Not only is it much simpler, but you can also create many different panel shapes such as diamonds, hexagons, and variable rectangles.

LunchBox For Grasshopper – Proving GroundLunchbox for Grasshopper – food4Rhino

Randomly extrude the blocks from a list of specific depths

To create our blocks we will simply extrude the faces by a certain dimension in the direction perpendicular to the plane we are working in. The XZ plane was defined earlier when we created our initial surface so we will want to extrude in the Y direction with a Unit Y vector.

For the factor (value) input into the vector, Grasshopper has a random component which will give us a list of unique random numbers within a domain but this list will include a lot of different decimal numbers which are not easy to build. For example, if we set a domain between 1 to 6 we will get a list of numbers including 2.006, 4.739, 5.713, etc… These numbers are not easy to build to so we will want to round the output in order to get clean integer numbers.

Create a labeled diagram to show which blocks are at what depth

Now that we have our finished block wall we want to provide information to the builder on which blocks are at which depths so it can be constructed. To do this we use the Text Tag component which takes a location and text to display. For the text, we will plug in our list of depths created at the end of the last section. We will place the text at the center of each box so we will use a Polygon Center component to gather the center points of each box. Once we have a pattern that we are satisfied with we can bake the text tag component to see our numbers populate over the geometry and now we have a diagram that can aid in the construction process.

Pieces of this script can be applied to many different projects so I’d recommend saving this in a folder to access later. Also, if you’d like to try to take this project one step further and use a curve attractor to manipulate the depths of the boxes in a more strategic way, check out my tutorial on curve attractors and see if you can apply that information here!

Thanks for reading.

An Architect Learning to Program

Learning how to program teaches you how to think logically the same way that practicing architecture teaches you how to think spatially. It teaches how to approach large problems and break them down into small manageable pieces which is a skill that any profession can benefit from.

Programming parallels architecture in the sense that simplicity is best, less is more & creativity is key.

There are many reasons one should learn to program as an architect, including:

  • enhanced use of computational design programs like Grasshopper, Rhino, and Dynamo through the use of scripting
  • creation of plug-ins & macros for Revit and other BIM / Modeling programs
  • writing animation and other scripts for virtual reality in programs like unity
  • learning data visualization in order to visually explain metrics that back up the design

I have been passively learning to program for about 2 years now and although I am still not comfortably able to do most of the items above, I am getting better with each exercise and I find that often I can translate knowledge from one program to the next.

Below is a quick look at the progression of steps I’ve taken on my journey:

Learning to use parameters (Revit, Grasshopper)

I wouldn’t really call this programming but it gave me exposure to the concept of providing the computer with instructions and seeing a malleable result. This completely revolutionized the way I work. All of a sudden I’m able to create something that’s computationally precise, specifically what the client needs, and flexible for experimentation and design. This is the power of BIM (Building Information Modeling). I still remember the first parametric model I made, a parametric louver family in Revit. I was captivated by the idea the computer would automatically update the changes based on variables I had set up in real time. I could experiment with the size of the louvers, the spacing, the quantity, the material, and the shape in a non-destructive manner, meaning I could go back and forth between options just by typing in different numbers. My mind was truly blown.

Codeacademy – HTML & CSS

I went through a few other ‘start to code’ websites but this was the most effective and it kept my attention long enough for me to finish it. Again, I wouldn’t call HTML or CSS programming but it explained the way that you talk to the computer in order to get output. For example, creating a reusable template of text styles like size, bold headings, italicized quotes that I could apply holistically to a document without having to select each one and change its properties individually anytime I wanted to make a change. Additionally, I learned about text editors and what writing code is in general.

Python

Although the markup language was a good stepping stone to learn, I was more interested in learning about functions and variables so I could start to program inside of the modeling software. Python was recommended to me as a simple language to learn and one that worked with Rhino. I found a fantastic online course through edx.com that taught the fundamentals of the language and programming in general. By the end of the class, I was able to program simple games and tools with ease.

In addition to the beginner class, I also took a course on Python for Data Science which really opened my eyes to how the computer actually translates code into vectors and shapes. This made grasshopper much easier to comprehend.

C#

Once I learned python it was much easier to make sense of C#. By no means am I an expert at either of them; frankly, I’m still very much a beginner, but I can confidently say that I know how to program. I began to learn C# while taking an online class about Virtual Reality Development using Unity from Udacity. I have primarily used the language to program animations in unity but am excited about learning to use c# with Grasshopper and other software.

Scripting in Grasshopper

The Designalyze blog has a quick and easy intro to C# scripting tutorial set that gave me the basics of how to write simple scripts in grasshopper. If you have exposure to programming and C# this will be a breeze; if not, it may seem a bit confusing but immediate visuals help to clearly show what the code is doing. The nice thing about scripting in grasshopper is that there is a text editor directly into the C# component so if you’re new to programming you don’t have to mess around with figuring out which text editor is best and how to run that code.

At this point, I have the basic tools and knowledge to embark on those ambitious goals I mentioned previously. It’s just a matter of starting.


Tips on Getting Started with Grasshopper for Rhino

Tips grasshoper rhino

Grasshopper can be a very intimidating software to learn. The tool requires you to look at architecture as geometry and physics rather than as strictly form. This can be challenging because it requires a different mindset; however, if you can get past this hurdle, the tool can be extremely powerful. With Grasshopper, we can iterate infinite possibilities of our designs and strategies in a non-destructive way.

When I was first getting started with grasshopper I recognized all of this possibility but had no idea where to start and was turned off by the complexity every time I opened up the program and tried to learn. Eventually, I gave myself a project to do and committed to somehow bringing grasshopper into the process. Over time, I became more comfortable with the program but I definitely learned some lessons along the way.

There are a ton of resources online, use them.

The only way you’re going to learn is by doing so I recommend either finding a project to do like a design competition or craft object; or, by finding some tutorials online to run through for practice. In addition to the official tutorials, Youtube is a great resource for videos but there are also lots of great learning websites with more robust plans. Below are a few that I have tried and liked.

When starting do not try to create everything in grasshopper

Use rhino with grasshopper to simplify the process when just beginning to learn. Some actions are more difficult and less efficient to do in grasshopper.

  • example : creating a unique curve shape to use in a pattern. Sometimes with complex curves, it is easier to create them in rhino and then manipulate them in grasshopper. This can also be said for curves that will create a lofted surface. The benefit of this is that you can freely edit the shape of the curves in Rhino without having to come up with a mathematical solution for reshaping the curves.

Say what you’re trying to do out loud if you get lost

With Grasshopper, you need to really understand what you’re components are doing because you are working on a more granular scale than with other modeling software. For this reason, it is easy to get lost along the way and by saying out loud exactly what you are trying to accomplish step by step it will be easier to locate the correct component. If you’re not much for talking to yourself then making a list or mind map will suffice.

  • example: you want to array a curve (shaped line) along a surface at various points. When modeling you can simply draw the curves (lines) on the surface wherever you’d like and be done with it. This is easy but limiting. Say you don’t know how many instances of the curve you want on the surface, or you’re not sure what the curve shape is yet. This is where grasshopper comes in; however, to do so you have to understand all the steps to
    1. draw the curve
    2. create a grid on the surface
    3. move the curve to the surface grid points using a translation vector
    4. orient the curve to lie flat on the surface using planes or other methods

Catalog your scripts into an organized library so they can be reused when needed

Often we are using the same definitions to do many different projects. When first learning grasshopper you will most likely be doing small tutorials that teach you how to accomplish a specific goal. When doing so it is good practice to save the definition into a folder with an associated image so that you can come back to it later and recognize what the definition is doing for when you want to reuse it in another project. In doing this you will soon have a library of basic definitions that you can reuse over and over again to make future projects much quicker.

Surround yourself with inspiration and motivation to make you think about practicing as often as possible

A few ways to do this are:

  • Find online resources that you like and bookmark the page so you see it in your bookmarks bar regularly
  • add the site as an additional homepage to open everytime you open up the internet. Next time you aimlessly open the browser the blog will be present and you’ll be more inclined to check up on what the latest is if you’re looking for somewhere to start.
  • subscribe to the channel on youtube
  • my favorite, change the background on your desktop to something related to the goal so everytime you sit down at the computer you think about working on something or getting to a certain point.

Becoming A Digital Designer in the AEC Industry

The advent of the computer has changed how we design and build. It has created an infinite amount of potential for complexity and purpose in building design. Over the past few years, I have come to realize that architects and designers have no choice but to increase their digital understanding and skill sets if they want to stay relevant in tomorrow’s design age.

The software and tools that we are being introduced to will upgrade the expectations of our output exponentially in the coming years. We will be expected to deliver projects smarter, faster, and more uniquely than we ever have before and the only way to do this will be with a digital design influence. With this in mind, I’ve started the Becoming a Digital Designer series to catalog my growth as a digital designer in hopes that it might help fellow architects and designers navigate the complex and diverse world of digital design.

The core benefits that digital design brings to the AEC (architecture, engineering, construction) industry include

  • increased efficiency in design and construction
  • informed and responsive design
  • creative freedom to express complex form, pattern, and texture

Although there are many firms and professional independents that are boldly experimenting and developing with these emerging ideas, the full potential of this has not yet been realized in the larger industry. In the coming years, we will see a phasing out of traditional methods and an influx of digital methods from the next generation of designers who have a much deeper understanding of digital processes.

What do I mean by digital design?

In the AEC industry, there are many different ways to organize this idea. Below is a good start to understanding some of the different aspects that digital methods bring to the process.

  • Visualization: how we tell our story and sell our designs
    • 2D Media, Rendering, Virtual/Augmented/Mixed realities, Video/Animation, Web/Application Development, Augmented sketching
  • BIM (building information systems)/ 3Dmodeling:: how we document and analyze our buildings
  • Software/add-ins: How we understand our buildings
    • Tools that have been developed to optimize, inform and enhance the existing software to provide unique and specific solutions for project needs.
  • Data capture and analysis: how we inform our designs
  • Computational design: how we add complexity and precision to our designs
  • Fabrication: how we build our designs
  • Electrical/ Hardware engineering (sensor/connected buildings) : how we connect our designs

Simply put, digital design is using the computer to aid and inform the design and construction process. This translates to a variety of methods during the building process from project capture to design development to construction. Below, the diagram illustrates where certain processes may come into play throughout the project.

project timeline

Most of these digital services utilize new and different skill sets that step beyond traditional architectural knowledge. This will require most professionals to seek training and/or continuing education to attain these new skillsets in order to provide adequate processes and designs. In order to take full advantage of these services, we need to embed experts with these skillsets onto our project teams and get them to knowingly train people on the job. Without this, all the knowledge lives with a few key people and the projects suffer.

I’m not saying everyone has to learn everything; just that the more we learn the better everything gets.

The path to becoming a comprehensive digital designer is quite overwhelming for a beginner due to the many seemingly unrelated subjects; however, if taken one step at a time, the knowledge will develop to a level where the designer feels comfortable using diverse digital design methods at all stages of building design and construction. The hardest part is starting.