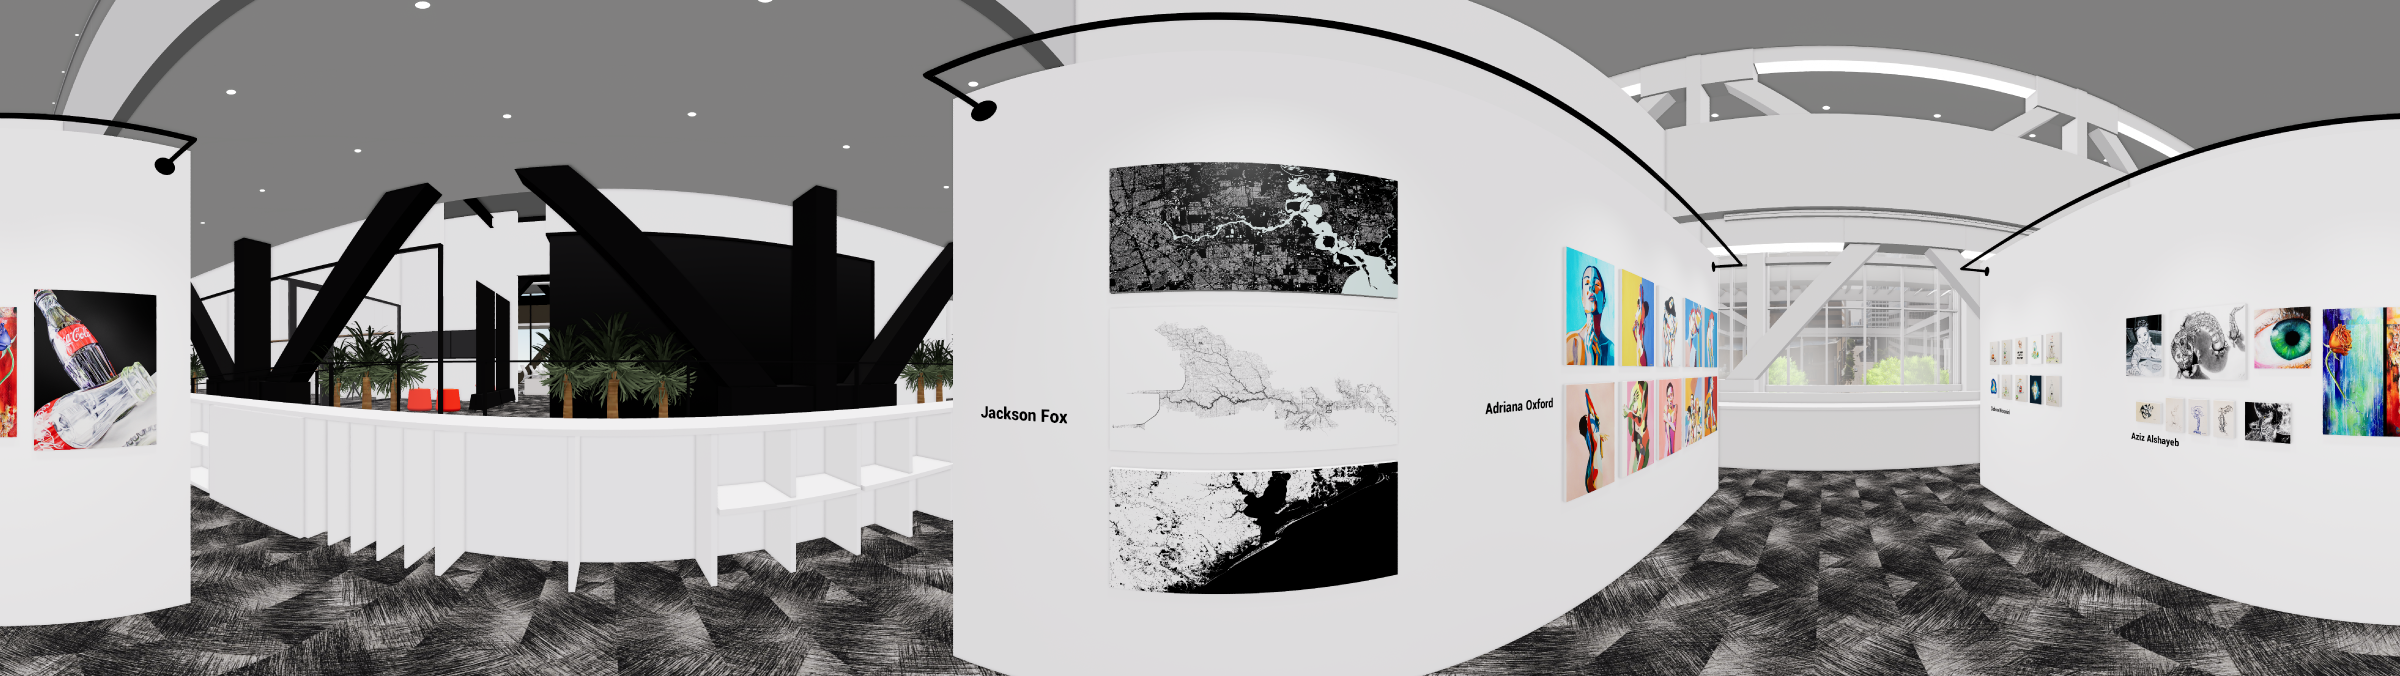
Diversions 2020: A Virtual Art Gallery

In the Gensler Houston office, we have been hosting an annual art event since 2014 that showcases the creative “diversions” of our fellow coworkers. Employees are encouraged to submit their personal work and passion projects – nothing Gensler or client related – and our office-turned-art-gallery typically displays everything from traditional art mediums to furniture, handcrafted jewelry, baked goods and infused alcohols.  Diversions has grown to become one of our best cultural and inspirational office events each year because it allows us to learn more about our coworkers and see their creative talents and passions firsthand.

Only a few months after we moved into our new office, the news of the pandemic hit and we all went home. Most of us haven’t been back since. Fast forward to September, we are still at home and we realize that our beloved Diversions celebration may not happen this year – a year when we need inspiration and culture the most.

We decided we weren’t going to let COVID-19’s cancel culture take this one, so we set off to make it virtual. Despite working from home, this year’s gallery was designed to virtually showcase the art in our own Houston Office with over 100 pieces in 20 different mediums.

To enter our virtual office gallery, click on the photo below. To learn more about how we made it, keep reading.

Click Image to Enter Virtual Diversions 2020

The Making of Virtual Diversions

Challenge: Create a virtual art gallery inside the Houston Office where people can interact with the art, read information about it and possibly link to websites where the user can find out more about the artist or maker.

There are many ways to make a virtual art experience. We knew we wanted the user to see the artwork displayed throughout the office and we had a pretty good 3D model started, so that step was mostly out of the way. Then we needed to figure out how we could allow the user to interact with the art so that they could get a good close-up view of each piece and read a few facts or quick description about the art.

This took a bit more thinking and experimentation. We tried a few different mechanisms for dealing with this and eventually ended up using the service Yulio to create a 360 interactive virtual tour of the office. We ‘hung’ the artwork in our 3D model, exported 360 panoramic images, uploaded those images to the Yulio website and added all the custom notes and photos to create the full experience. We ended up doing it this way primarily because it was the easiest way to share a virtual experience with a simple weblink; however, on the way there we developed a more experimental version.

Walking and interacting with art in Unreal Engine

Using unreal engine, a game/experience development software, we added interactivity to our 3D model elements and created an experience that allows the user to freely walk around the office and interact with the artwork in a similar but more custom and personal way. This interactivity was created using the Blueprints system in Unreal Engine which is a type of visual programming similar to Grasshopper for Rhino. Utilizing this workflow allows us to reuse these blueprint scripts in future projects. This R&D brings us closer to being able to deliver this type of custom experience to our clients which will allow them to engage in a more unique way with their projects.

Quick look at player character blueprints system in Unreal Engine

This type of experience could manifest in many different ways including a training experience where clients can take new employees through the building, show them around or train them how to use specific equipment. We could also create an experience that takes a potential tenant through a new development, highlighting the amenities and possible floor plan layouts. From a design perspective, we can create custom experiences for proposals that tell an interactive story where each stakeholder can freely walk around and discover the design in a truly exploratory way. 

While you’re in the exhibit don’t forget to check out my mandala art on display!

Angela Palmer Mandala Gallery 360 Panoramic

The Diversions Team

Design Technologist: Angela Palmer & Bryan Brady 

PR: Nina Miller, Shaina Pherigo, Katelyn Howard

25 Days Creative

A few weeks ago I decided to embark on a creative adventure. I started a new career as a design technology specialist at the architecture and design firm Gensler. I have worked at this firm for over six years as an architectural designer but my passions and interests have shifted towards design technology. My specialties are in virtual reality and computational design but my interests span many creative platforms. As a way to jump-start this new beginning and build up a portfolio of experience, I have been creating daily art pieces on a somewhat regular basis and posting them to Instagram under the hashtag #100dayscreative. I am not very strict about being consecutive but I am trying to wrap it all up in a somewhat small amount of time.

The projects are usually focused on learning a new skill or trying out a new software or plugin. There usually isn’t enough time to dig deep but the idea is more about exposure and making the time to be creative.

Below are some works from the first 25 days that were showcased at an office-wide art exhibit. Software used includes Adobe Illustrator, Adobe After Effects, Grasshopper 3D, Rhinocerous, Adobe Premiere, Adafruit electronics, Google Tiltbrush, and Gravity Sketch.

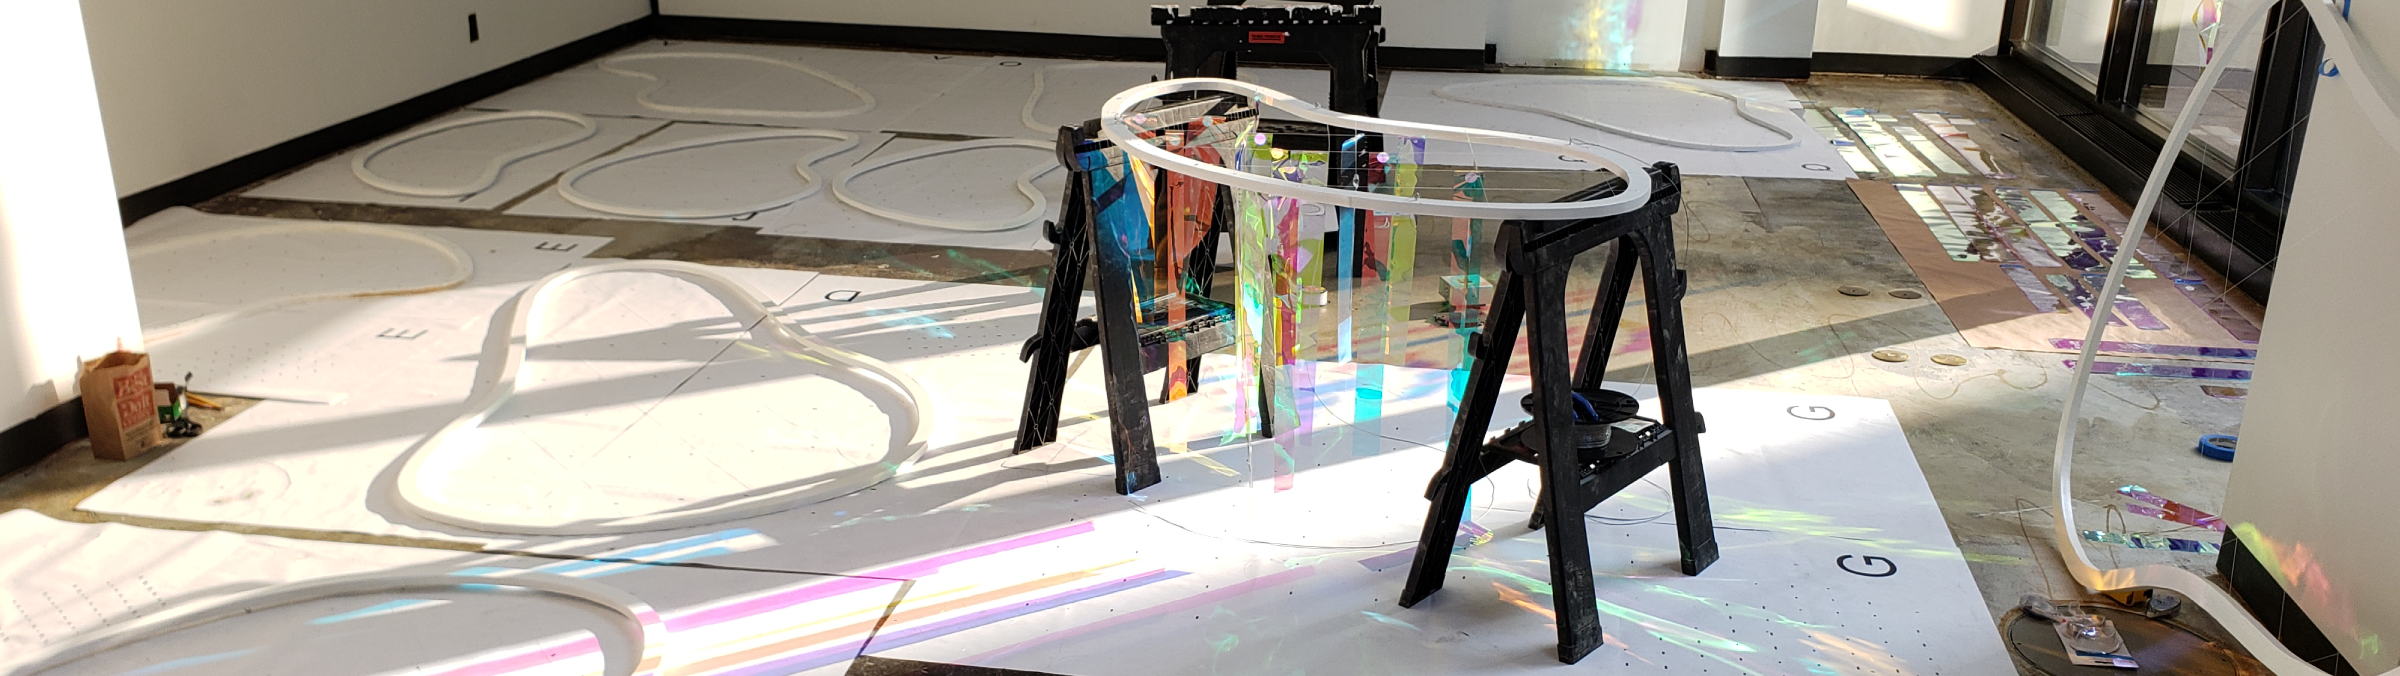
The Making of Holographic Sky

Holographic sky was created by the Design Labs Houston group at the architecture and design firm Gensler. Design labs Houston is a grassroots organization that experiments and works with future technologies and practices in the design industry. The installation was created for Transwestern as part of their artist series. For more information

The Holographic Sky art installation celebrates the grandiose natural light of the architecturally iconic Pennzoil atrium by utilizing reflective, dichroic materials which introduce the vibrant colors of Houston street art into the lobby. The hanging clouds take advantage of the volume of the space while also seeking to bring the scale of the lobby down to the pedestrian level.

Digital Design – Grasshopper with Rhinoceros 3D

The installation was initiated as a way for the group to practice using computational software on a real project. The scope had to be small enough for experimentation but Design Labs Houston was insistent on using parametric software in the design and construction. Grasshopper with Rhinoceros 3D were chosen for the digital design.

We began searching for the right project and came across the artist series hosted by Transwestern in the building Gensler Houston occupies, Pennzoil Place. On being accepted as their next artist, we became inspired by the architecture and wanted to celebrate its primary asset, all of the natural light that washes the atrium.

The initial focus was to create a canopy of some sort over visitors that would give them the impression of being under a prismatic or holographic sky. We wanted to bring color into the lobby in a way that would interact with people and change throughout the day as the sun came in and out. As we further developed the design and became more comfortable with grasshopper, the group decided to move to a more organic shape that would really challenge us in construction and assembly. The new shapes were also a better representation of abstracted cloud formations hanging in the sky.

With the idea in mind, we could move on to grasshopper and begin modeling. By the time we were at the cloud design we had already modeled the first two options above in grasshopper so we were able to recycle the scripting for the fin creation and reuse it in our cloud script.

Grasshopper was an essential tool in the delivery of the project. Throughout the design, we were able to estimate the total cost of the install. Once we purchased the dichroic film material we were able to adjust the scale and density of the clouds to accommodate how much material we had to work with. The program not only helped in the design phase but also during construction.

Construction

We created a template in grasshopper for each cloud that included the frame cut, the string pattern, and the length and location for each fin. Each grid string was hand strung and every fin was hand cut… all 952 of them. We then placed all the fins along the string in their proper place and hung the clouds in the atrium. Although the next day was rainy,  the sun made an appearance and we were able to see the installation in full effect.

Also see Holographic Sky

Design an array of geometry at various scales with curve attractors in grasshopper

Project Overview

A few months ago I was asked to create a custom wall graphic for a project and it provided the perfect opportunity to use grasshopper at work. We design spaces for this company all over the country and they always have a custom design that expresses their key values at the reception of their office space. The design always includes the same value in text and an associated logo; so, by creating a grasshopper script we will be able to design a multitude of unique options for all of the offices around the country.

One of my favorite things to experiment with in grasshopper is attractors because the concept can be applied to many different applications to provide a unique look. For confidentiality reasons, I will be using a different logo and text.

We will be creating a grid of geometry that scales based on a curve attractor in order to get a set of geometry that responds to a central set of text.

I will be using the LunchBox for grasshopper plug-in to create the grid structure which can be downloaded from either of the websites below. Grasshopper has some built-in functionality to create grid arrays but I personally prefer the lunchbox component for this.

LunchBox For Grasshopper – Proving GroundLunchbox for Grasshopper – food4Rhino

Once you have lunchbox installed, open up Rhino and Grasshopper and let’s get started.

Create the wall boundary and grid for the array of the logo

The first thing we want to do is to define the boundary for the graphic and create a grid that will host all of the individual shapes. Because I am designing the graphic for a defined wall size and shape, I will draw this boundary in Rhino and set the curve in grasshopper. I am using a 9′-0″ x 13′-0″ rectangle.  In grasshopper, I will then create a surface from my boundary curve and apply a grid to it using the lunchbox diagonal grid component. By hovering over any of the input/output variables on a component, you can figure out what type of information the variable is asking for. We will use number sliders to define how many rows and columns (U &V divisions) that we want in our pattern. Once we have our grid we will use a point component to get a list of all of our points.

Note that any surface can be used at this stage, even 3-dimensional surfaces created in Rhino.

Remove points along the edge of the boundary curve

After creating the grid of points, you will notice that some of the points fall onto the boundary of the curve. We are creating a graphic that will be printed on a material (film in this case), so we do not want any geometry on the boundary because it will be cropped when printing. To remedy this we will create a boundary cull which will delete/ignore any of the points that intersect the boundary curve.

The boundary cull does the following:

  1. Test if the points are outside the curve (0), intersecting the curve (1) or inside the curve (2) with the points in curve (incurve) component.
  2. Integer divide the incurve results so we are left with only 0’s & 1’s. 0 will represent false, 1 will represent true. Note: you must use integer divide rather than divide so that we get a 0 instead of a 0.5 when dividing the incurve results by 2.
  3. Use a cull pattern component which will assign a point to the 1 (true) values and not to the 0 (false values). This, in essence, removes/ignores any point that is intersecting our boundary curve.

Draw the logo geometry in Rhino and move a scaled copy to each point

When first getting started with Grasshopper, an important thing to remember is that you don’t have to create everything in Grasshopper. For our logo, we most likely want something that is not a basic shape and is much easier to freehand draw in Rhino. This shape would take much more time to create in grasshopper and there is no reason to do so. I have drawn the bowtie shape below with a polyline but you can use any shape you’d like. When using a polyline it is easier to find the center of the geometry; however, if you need a curve or set of curves for your geometry it requires a few more steps. For this, you need to create a bounding box around your geometries and find the center point of that box for use in the next section.

Once the shape is drawn we will create a scaled copy of the geometry at each point in our grid by moving it along a vector from the center point to our list of culled points from the previous section. In the next section, we manipulate how the geometry scales to get the various sizes.

Create a curve attractor to manipulate the scaling of the geometry

Now that we have the geometry arrayed onto the grid we can use a curve attractor to manipulate how the geometry is scaled when we move it. The basic idea is that we draw a curve across the surface and the geometry will scale to be bigger or smaller depending on how close it is to the curve. We will be using domains and the ReMap component below which can get a little tricky. A domain is a range of numbers from the low point to the high point.

To create the curve attractor:

  1. Draw a curve in Rhino that intersects the surface and use the curve closest point (Crv CP) component to associate the curve with our grid of points.
  2. Use the bounds component to capture the domain of the distances of the points from the curve. In other words, we capture a list of how far each point is from the curve and use the closest and farthest distance to create the domain.
  3. Construct a new domain that states the range of how big to small we want the geometry to scale to. For example, we want the smallest geometry to be .125″ (1/8″) and the largest to be .5″ (1/2″) so we construct a domain with a start of .125″ and an end of .5″.  We can flip these numbers to change how the geometry reacts to the curve. If the small value is plugged into the A variable of the domain component then the geometry will be smallest at the points that are closest to the curve. If we switch and plug in the smallest value into the B variable, the geometry will be largest at the points closest to the curve.
  4. Remap the distances gathered from the Crv CP component to the new domain constructed in the last step. We want to create a new list of scaling factors based on how far each point is from the curve. We use the ReMap component to do this by taking the smallest distance of a point from the curve and assigning it the smallest scale factor from the newly constructed domain. Additionally, we do the same thing with the farthest point from the curve and assign it to the largest scaling factor from the new domain. All of the other point distances scale relationally between those two extremes. The output of the ReMap component is this newly constructed list of scaling factors that are directly related to how far each point is from the curve. We then take this list and plug it into the scale component.

Add text in the middle of the geometry

The last item is to incorporate the key values into the design. The idea is to have text in the middle of the pattern that the geometry radiates outwards from. To do this we will repeat the same points in curve series from the boundary cull section; however, we will invert the pattern so we remove any points within the middle area of a circle where we want to have the text. Once we have our new list of points we will replace that list with any variable that was hosting our previous points list.

To get the radiating effect, we will change the curve attractor to the new circle in the middle of the graphic so the geometry is larger at the circle and gets smaller as it moves towards the edge of the wall.

Finally, we add our text in Grasshopper and the pattern is ready to bake and export to Cad, illustrator or any other file type needed.

Final Image